
| 1. Accounts Payable | This represents balances owed to vendors for goods, supplies, and services purchased on an open account. Accounts payable balances are used in accrual-based accounting, are generally due in 30 or 60 days, and do not bear interest. |
| 2. Accounts Receivable | This represents amounts owed by customers for items or services sold to them when cash is not received at the time of sale. Typically, accounts receivable balances are recorded on sales invoices that include terms of payment. Accounts receivable are used in accrual-based accounting. |
| 3. Accumulated Depreciation | This is a contra asset account to depreciable (fixed) assets such as buildings, machinery, and equipment. Depreciable basis (expense) is the difference between an asset's cost and its estimated salvage value. Recording depreciation is a way to indicate that assets have declined in service potential. Accumulated depreciation represents total depreciation taken to date on the assets. |
| 4. Cash | This represents deposits in banks available for current operations, plus cash on hand consisting of currency, undeposited checks, drafts, and money orders. |
| 5. Cost of Sales | This represents the known cost to your business for items or services when sold to customers. Cost of sales (also known as cost of goods sold) for inventory items is computed based on inventory costing method (FIFO, LIFO, or Average Cost). LIFO is not allowed by International Accounting Standards |
| 6. Equity - Doesn't Close | This represents equity that is carried forward from year to year (like common stock). Equity is the owner's claim against the assets or the owner's interest in the entity. These accounts are typically found in corporation-type businesses. |
| 7. Equity - Gets Closed | This represents equity that is zeroed out at the end of the fiscal year, with their amounts moved to the retained earnings account. Equity, also known as capital or net worth, are owners' (partners' or stockholders') claims against assets they contributed to the business. |
| 8. Equity - Retained Earnings | This represents the earned capital of the enterprise. Its balance is the cumulative, lifetime earnings of the company that have not been distributed to owners. |
| 9. Expenses | These represent the costs and liabilities incurred to produce revenues. The assets surrendered or consumed when serving customers indicate company expenses. If income exceeds expenses, net income results. If expenses exceed income, the business is said to be operating at a net loss. |
| 10. Fixed Assets | These represent property, plant, or equipment assets that are acquired for use in a business rather than for resale. They are called fixed assets because they are to be used for long periods of time. |
| 11. Income | Income (also known as revenue) represents the inflow of assets resulting from the sale of products and services to customers. If income exceeds expenses, net income results. If expenses exceed income, the business is said to be operating at a net loss. |
| 12. Inventory | This represents the quantity (value) of goods on hand and available for sale at any given time. Inventory is considered to be an asset that is purchased, manufactured (or assembled), and sold to customers for revenue. |
| 13. Other Assets | This represents those assets that are considered nonworking capital and are not due for a relatively long period of time, usually more than one year. Notes receivable with maturity dates at least one year or more beyond the current balance sheet date are considered to be "noncurrent" assets. |
| 14. Other Current Assets | This represents those assets that are considered nonworking capital and are due within a short period of time, usually less than a year. Prepaid expenses, employee advances, and notes receivable with maturity dates of less than one year of the current balance sheet date are considered to be "current" assets. |
| 15. Other Current Liabilities | This represents those debts that are due within a short period of time, usually less than a year. The payment of these debts usually requires the use of current assets. |
Monday, January 26, 2009
Account Types
Account Type is compulsory for all account that you set up. In Peachtree Premium 2008, there are 15 account type includes the following:
Set Up Chart of Account
Chart of accounts is the underlying system for all the work you do in Peachtree. Each time you save (or post) a transaction, an entry is made to at least two accounts – a debit or credit.
If during setting up a company, you select to build chart of account from sample business type, there will be a list of account created already for you. However, if you select to build your own chart of account, there will be no any account yet in account list.
1. Select Maintain on menu, click on Chart of Accounts…
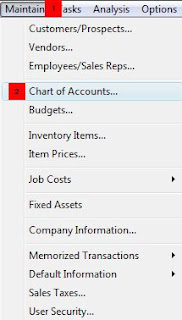
2. Enter Account ID, Description, and select Account Type.
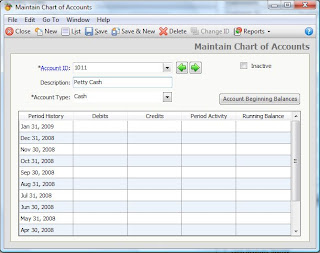
3. Click on Save or Save & New.
Thursday, January 22, 2009
Set Up User Account
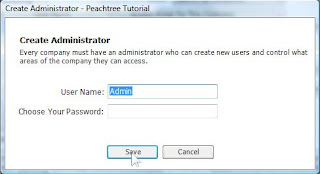
The User Security feature is handled by a number of windows that let you create a company administrator, who has the right to set up other company users, and then enter and grant rights to those users.
1. Click Maintain, then select User Security.
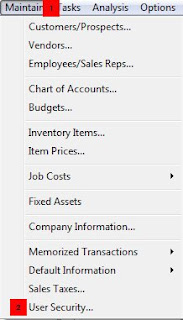
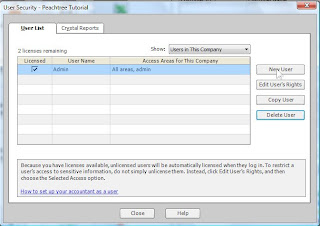
2. Click New User.
Note on the Show: there are two options:
- User in This Company: Peachtree shows only user that use current opened company.
- User in All Companies: Peach shows all users for all companies that you used to accessed either in your local computer or on the network.
3. If you have not yet set up password for Administrator, you need to do it by typing password and click Save.
4. Now the password of Admin is defined. If you want to create user for other staff, select New User again.
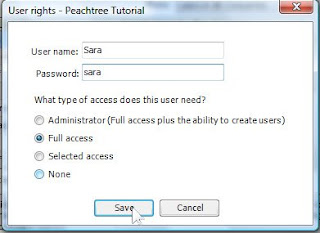
5. Enter user name and password. Then select one of the four access rights. Then select Save or Next.
- Administrator: this user can do anything in the system.
- Full access: this user can do anything, expect create new user.
- Selected access: you customize the right for the user, for example, allowing user to use only sale module, etc.
- None: user cannot do anything in the system. This option is used when for example the user is on leave.
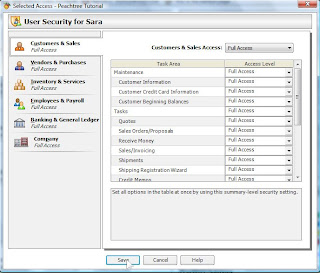
6. If you select Selected access in step 5 above, the next following window open to let you select the user right. Define the right of user and click Save.
7. In case you want to edit the right of user, select on user and click Edit User’s Right.
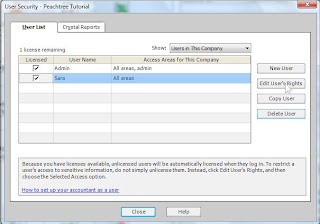
8. In case you want to delete user, select on user and click Delete.

1. Click Maintain, then select User Security.

2. Click New User.
Note on the Show: there are two options:
- User in This Company: Peachtree shows only user that use current opened company.
- User in All Companies: Peach shows all users for all companies that you used to accessed either in your local computer or on the network.

3. If you have not yet set up password for Administrator, you need to do it by typing password and click Save.

4. Now the password of Admin is defined. If you want to create user for other staff, select New User again.
5. Enter user name and password. Then select one of the four access rights. Then select Save or Next.
- Administrator: this user can do anything in the system.
- Full access: this user can do anything, expect create new user.
- Selected access: you customize the right for the user, for example, allowing user to use only sale module, etc.
- None: user cannot do anything in the system. This option is used when for example the user is on leave.

6. If you select Selected access in step 5 above, the next following window open to let you select the user right. Define the right of user and click Save.

7. In case you want to edit the right of user, select on user and click Edit User’s Right.

8. In case you want to delete user, select on user and click Delete.

Tuesday, January 20, 2009
Create a Company
You can run Create a New Company in two different situations:
- When you set up your first company in Peachtree.
- When you set up an additional new company in Peachtree after working in another company on the system.
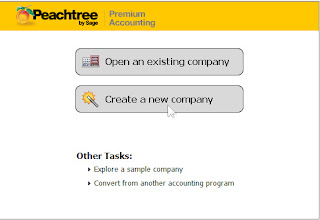
You can start Create a New Company from either the startup window or the Peachtree File menu:
From the Peachtree Startup window, select Create a new company. The Create a New Company - Introduction window appears.
Or
1. From the File menu, select New Company. Or Ctrl + N.
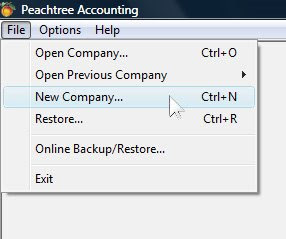
2. Click Next
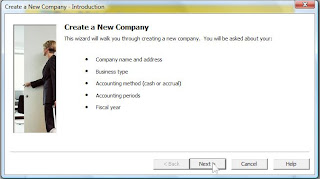
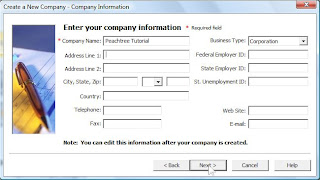
3. The next window let you enter general information about your company. Enter your company information, then click Next
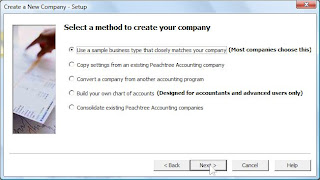
4. It’s time to set up your company chart of account. You can use 5 options to design your company chart of account. But the most used 3 potions are number 1: Use a sample business type that closely matches your company, number 2: Copy setting from an existing Peach Accounting company and number 3: Build your own chart of account. If you are not sure which one to choose, I suggest you to choose option number 1 and edit your chart of account later.
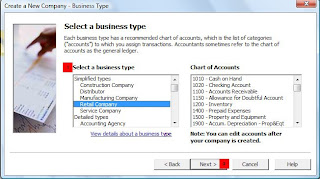
5. Choose business type that describes your company industry. If your company operates an advertising service, you can select Service Company or Advertising Agency. After selecting, click Next.
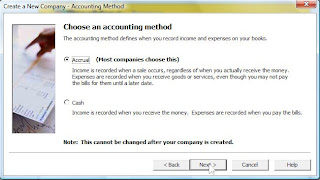
6. Choose an accounting method. You can choose either Accrual or Cash. In cash accounting, you recognize income or expenses when you receive or spend cash. In accrual accounting, you recognize income and expenses when you send or receive an invoice. Click Next after selecting your option.
According to International Accounting Standards, you should choose Accrual.
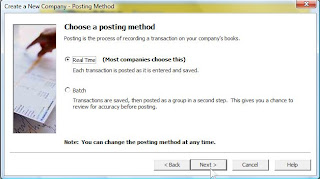
7. Choose a posting method. Real time method is preferable. Click Next after selecting your option.
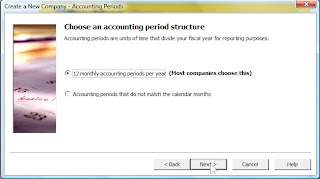
8.Choose an accounting period structure. You should select the first option if you follow the 12 months period which means starting from January to December. Choose option 2, if your accounting period is different from 12 months period, for example start in June 2008 and end in June 2009.
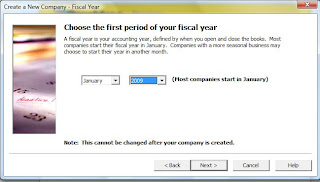
9. Choose the first period of your fiscal year. Even if you start your business on May 2009, you should choose January 2009 to ensure that your accounting records cover 12 months period. Click Next.
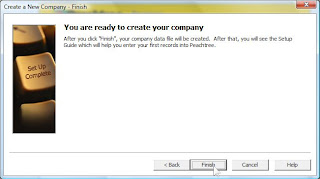
10. Click Finish.
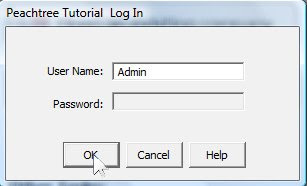
11. Now click OK to open your company.
- When you set up your first company in Peachtree.
- When you set up an additional new company in Peachtree after working in another company on the system.
You can start Create a New Company from either the startup window or the Peachtree File menu:
From the Peachtree Startup window, select Create a new company. The Create a New Company - Introduction window appears.

Or
1. From the File menu, select New Company. Or Ctrl + N.

2. Click Next

3. The next window let you enter general information about your company. Enter your company information, then click Next

4. It’s time to set up your company chart of account. You can use 5 options to design your company chart of account. But the most used 3 potions are number 1: Use a sample business type that closely matches your company, number 2: Copy setting from an existing Peach Accounting company and number 3: Build your own chart of account. If you are not sure which one to choose, I suggest you to choose option number 1 and edit your chart of account later.

5. Choose business type that describes your company industry. If your company operates an advertising service, you can select Service Company or Advertising Agency. After selecting, click Next.

6. Choose an accounting method. You can choose either Accrual or Cash. In cash accounting, you recognize income or expenses when you receive or spend cash. In accrual accounting, you recognize income and expenses when you send or receive an invoice. Click Next after selecting your option.
According to International Accounting Standards, you should choose Accrual.

7. Choose a posting method. Real time method is preferable. Click Next after selecting your option.

8.Choose an accounting period structure. You should select the first option if you follow the 12 months period which means starting from January to December. Choose option 2, if your accounting period is different from 12 months period, for example start in June 2008 and end in June 2009.

9. Choose the first period of your fiscal year. Even if you start your business on May 2009, you should choose January 2009 to ensure that your accounting records cover 12 months period. Click Next.

10. Click Finish.

11. Now click OK to open your company.

Upgrade Peachtree
If you are upgrading from an earlier release of Peachtree, Peachtree will give you the option of 1) installing the new release over the old release, or 2) installing to a new location on the computer so that you will keep your old release of Peachtree.
If you choose to keep the older release but convert your Peachtree company data to Release 2008, you will NOT able to access that data with the old release.
If you choose to install over the old release, your Peachtree company data will NOT be overwritten. Rather, when you open the company for the first time, your will initiate the Conversion wizard to update the data files to Release 2008.
"With my own experience, I strongly suggest you to completely uninstall the old release and reinstall the new release. Then, you can use conversion wizard to transform your backup into new release."Sunday, January 18, 2009
Uninstall Peachtree
If you need to remove Peachtree, follow the steps below:
To uninstall Peachtree program files, do the following:
1. Make a backup of any data files you have created.
2. Close Peachtree.
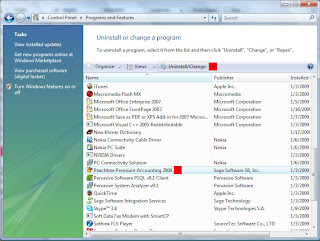
3. Click on Start, Control Panel, then Progams and Features.

4. Select Peachtree program and click on Uninstall/Change.
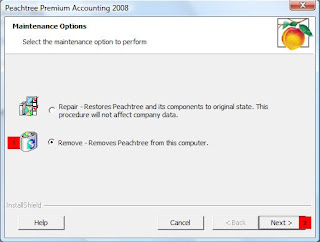
5. Click on Remove, then Next.
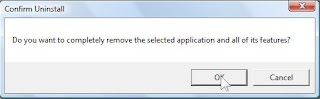
6. Click OK
7. When Peachtree is completely uninstall, the following messege will appear. Click Finish.
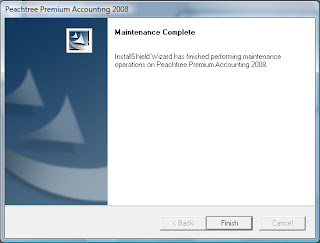
8. Restart to refresh your computer.
When you uninstall Peachtree, all components are removed from your system. Your personal company data will remain on your hard disk.
To uninstall Peachtree program files, do the following:
1. Make a backup of any data files you have created.
2. Close Peachtree.
3. Click on Start, Control Panel, then Progams and Features.

If you use Window XP, from the Window Start menu, select Settings, Control Panel, then Add/Remove Programs.
4. Select Peachtree program and click on Uninstall/Change.

5. Click on Remove, then Next.

6. Click OK

7. When Peachtree is completely uninstall, the following messege will appear. Click Finish.

8. Restart to refresh your computer.
Thursday, January 15, 2009
Overview of Setup Tasks
Basically, your remaining tasks, after completing installing the software, will be something like this:
1. Create Your Company: Company profile, chart of accounts, posting method, accounting method
2. Set Up Your Company: Beginning balances, default and information for customers, vendors, employee
3. Run Your Company: record transactions and print forms
4. Analyze Your Business: reports and financial statements.
These are the basic tasks that most people will perform. Of course, it all depends on what you want from your Peachtree system. You may use an outside source for payroll, which what I am doing currently in my company, so you don't need to set that up.
You don't have to set up all your customers, vendors, and employees at once. You can set them up on as-needed basis, when you need to record a transaction.
Starting the Program
Select Start on the window taskbar and then Programs. Locate and select the Peachtree group folder. Then select the Peachtree icon.
Tuesday, January 13, 2009
Install Peachtree on a Single Computer
This section is for users who are installing Peachtree on only one computer and that computer will hold both Peachtree program files and the Peachtree company data files.
1. Insert the Peachtree compact disc in your CD ROM drive. The Peachtree Autorun window automatically appears.
If the Autorun window does not automatically appear, do the following: click on CD-ROM, and double click on Setup icon as shown below.

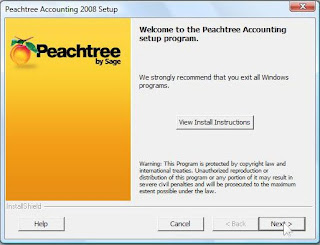
2. Read the informaion and instruction on the window, and then select Next.
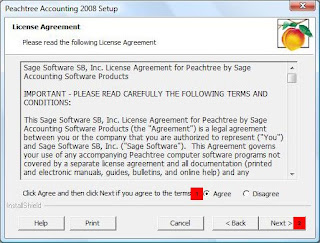
3. Read the License Agreement and, if you accept the terms, select the Agree option. Select Next
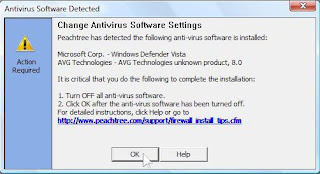
4. At this time, you may receive a warning that the Microsoft Windows firewall has been detected. If, so we recommend that you select OK.
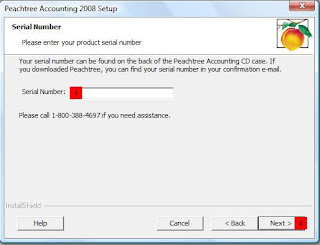
5. Enter serial number found on your CD sleeve and click Next.
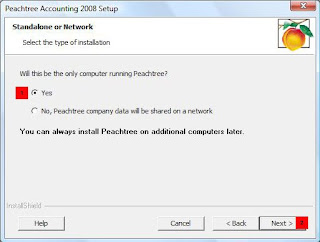
6. Next, the Standalone or Network window appears. Select Yes. This will ensure that you install correctly for single user setup. Click Next.
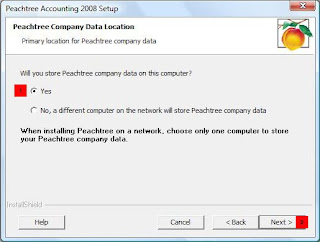
7. Select Yes to the question "Will you store Peachtree company data on this computer?" Click Next.
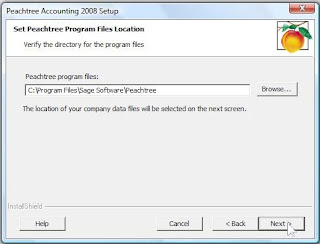
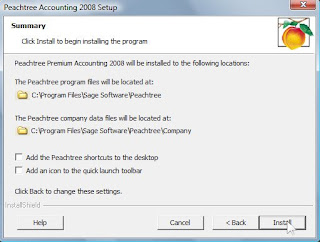
8. The Set Peachtree Program Files Location window appears, asking you to specify where you want to put the Peachtree Program files. Enter the appropriate path here or leave it set to the default. Click Next to continue.
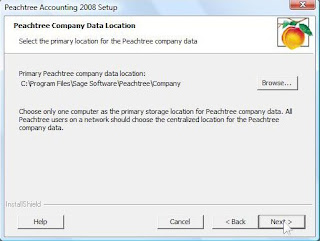
9. Now, you can accept the default location for your Peachtree company data files or you can click Browse and select a different location. Click Next to continue.
10. Unselect Add the Peachtree shortcuts to desktop and Add an icon to the quick launch toolbar. Then click Install.
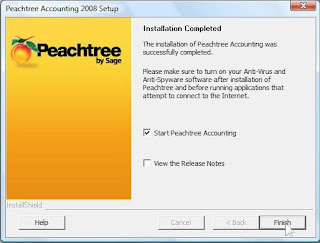
11. Click Finish.
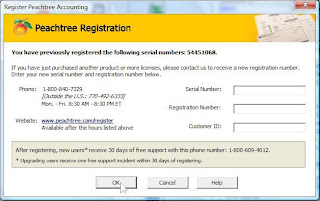
12. Click Help, then Peachtree Registration. Enter Serial Number, Registration Number, and Customer ID. You can obtain all codes from CD sleeve. Click OK.
1. Insert the Peachtree compact disc in your CD ROM drive. The Peachtree Autorun window automatically appears.
If the Autorun window does not automatically appear, do the following: click on CD-ROM, and double click on Setup icon as shown below.

2. Read the informaion and instruction on the window, and then select Next.

3. Read the License Agreement and, if you accept the terms, select the Agree option. Select Next

4. At this time, you may receive a warning that the Microsoft Windows firewall has been detected. If, so we recommend that you select OK.

5. Enter serial number found on your CD sleeve and click Next.

6. Next, the Standalone or Network window appears. Select Yes. This will ensure that you install correctly for single user setup. Click Next.

7. Select Yes to the question "Will you store Peachtree company data on this computer?" Click Next.

8. The Set Peachtree Program Files Location window appears, asking you to specify where you want to put the Peachtree Program files. Enter the appropriate path here or leave it set to the default. Click Next to continue.

9. Now, you can accept the default location for your Peachtree company data files or you can click Browse and select a different location. Click Next to continue.

10. Unselect Add the Peachtree shortcuts to desktop and Add an icon to the quick launch toolbar. Then click Install.

11. Click Finish.

12. Click Help, then Peachtree Registration. Enter Serial Number, Registration Number, and Customer ID. You can obtain all codes from CD sleeve. Click OK.

Subscribe to:
Posts (Atom)